1. CURRICULUM ALIGNMENT
- Syllabus Objectives:
- To define relief sculpture and distinguish it from “in-the-round” sculpture.
- To understand the types of relief (Bas-relief vs. High-relief).
- To create a relief sculpture using additive or subtractive methods.
- Prerequisite Knowledge: Understanding of form and volume (from previous pottery topics).
2. TOPIC INTRODUCTION
Relief sculpture is a unique “middle ground” between a 2D drawing and a 3D statue. It is a sculpture that remains attached to a background surface. Imagine a picture that is “popping out” of the wall. In Uganda, relief sculpture can be seen in traditional architectural carvings on house pillars, metal embossing, or even decorative cement work on building facades.
The Hook: If you look at a coin, the face of the person is a relief sculpture—it is raised from the flat background. How does the artist decide which parts should be “high” and which should be “low” to make it look like a real person?
3. LEARNING OBJECTIVES
By the end of this lesson, learners should be able to:
- Differentiate between Bas-relief (low relief) and High-relief.
- Apply additive (adding material) and subtractive (carving away) techniques.
- Use light and shadow to enhance the depth of a relief sculpture.
- Create a simple relief sculpture using clay, plaster, or carved wood.
4. KEY TERMS AND DEFINITIONS
- Bas-relief (Low Relief): The sculpture projects only slightly from the background (like a coin).
- High Relief: The sculpture projects significantly, sometimes appearing almost detached from the background.
- Additive Method: Building up the form by adding material (like adding bits of clay).
- Subtractive Method: Removing material to reveal the form (like carving).
- Background: The flat surface that supports the relief sculpture.
Memory Hook: Think of relief sculpture like “Shadow Play.” The higher the relief, the more dramatic the shadow it casts on the wall behind it.
5. DETAILED EXPLANATION OF CONCEPTS
A. The Two Types of Relief
- Bas-Relief (Low): Great for detailed, narrative scenes where you want the focus to be on the shapes and lines rather than deep 3D volume.
- High-Relief: Used for dramatic impact, where figures might be carved so deeply that they are 50% or more detached from the background.
B. Techniques for Creating Relief
- Additive: Start with a flat slab of clay. Build up the figures by adding small coils or balls of clay and smoothing them into the background.
- Subtractive: Start with a thick block of material (like soft wood or soap). Use carving tools to remove material, leaving the “highest” parts of your design untouched.
| Feature | Bas-Relief | High-Relief |
| Projection | Very shallow | Very deep/bold |
| Shadows | Subtle | Strong/Dark |
| Material Usage | Saves material | Uses more material |
6. VISUAL LEARNING SUPPORT
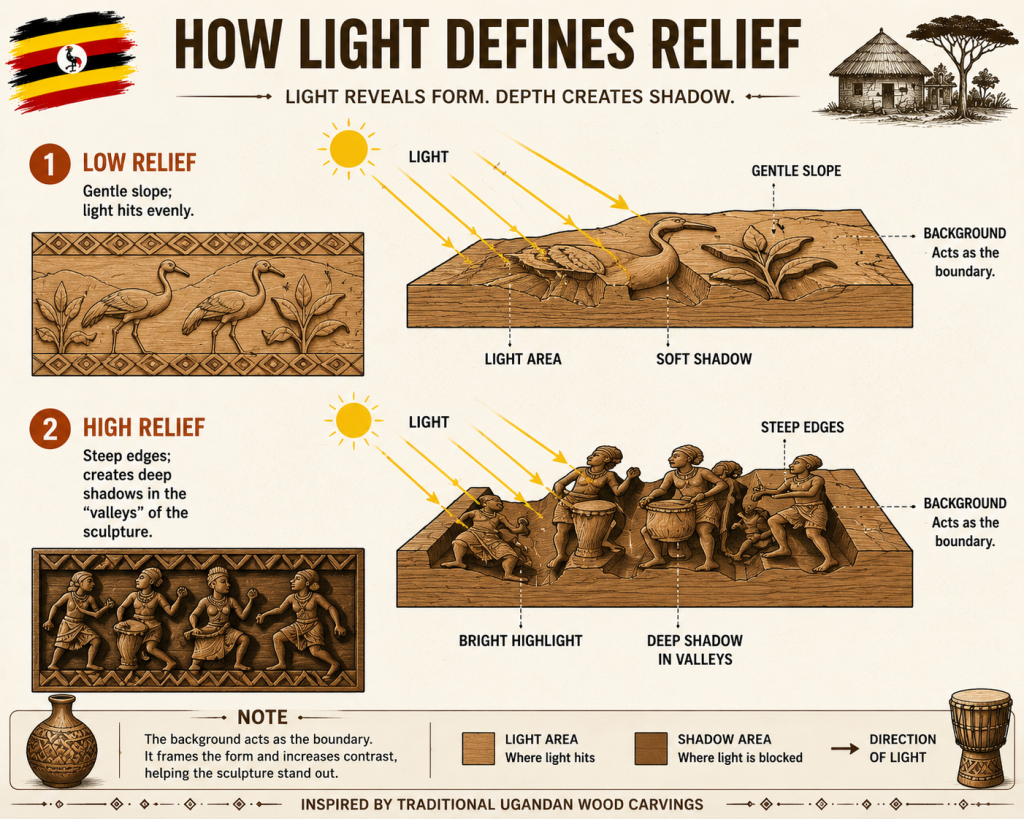
The Core Distinctions (Visualizing Depth)
The difference between Bas-Relief (Low) and High Relief isn’t just about how much clay or stone is used; it is about how the piece “commands” the space around it.
- Bas-Relief (Low Relief):
- Visual: Think of a coin or a medal. The figures barely rise above the flat surface.
- Technical Tip: Avoid “undercutting” (carving underneath a shape). Everything should slope gently back into the background.
- Best for: Intricate narrative scenes (e.g., a crowd of people or a detailed landscape) where you want the viewer to “read” the image like a book.
- High Relief:
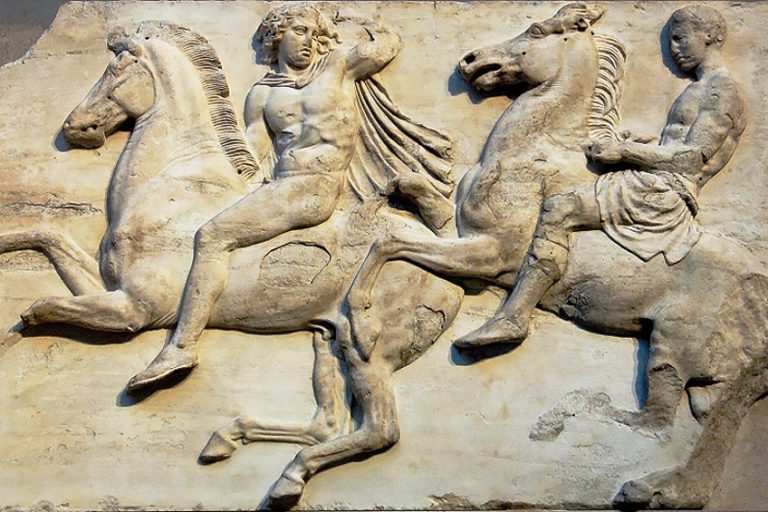
- Visual: Think of classic cathedral carvings or Mount Rushmore. Figures might project 50% or more from the wall.
- Technical Tip: Use “undercutting” to create deep shadows. When you carve under the chin or the arm of a figure, you create a dark “pocket” of shadow that makes that limb pop out, making it look almost detached.
- Best for: Dramatic, emotional, or heroic subjects that need to grab attention from across a room.
Techniques for the Studio
Whether you are using clay, soap, or cardboard, you will likely use one of these two approaches:
| Method | Approach | Best Used For |
| Additive | Building up layers | Clay or paper-based projects where you want organic growth. |
| Subtractive | Carving away | Materials like soap, wood, or dense foam where you “reveal” the shape. |
Pro-Tip for Clay Reliefs:
Always build on a firm base (like a thick board or slab). If your background is flimsy, your relief will warp or crack as it dries. If building “High Relief” in clay, use an armature—a wire or wooden frame—to hold the heavy “popping out” parts so they don’t sag while the clay is still wet.
Ugandan Context & Inspiration
Relief sculpture is deeply embedded in our visual history. We see it in:
- Architectural Ornamentation: Many traditional buildings and modern monuments use relief to tell stories. Think of the Independence Monument in Kampala; while it is a full 3D statue, the way the figures interact and the details “carved” into the figures’ clothing are a form of relief-style storytelling.
- Functional Crafts: Many Ugandan artisans carve patterns into wooden bowls, drum frames, or walking sticks. This is subtractive relief carving. The motif (like a diamond or triangle) is left “high,” while the background is cut away, creating a tactile texture that is both beautiful and functional.
7. TEACHER DEMONSTRATIONS AND PRACTICAL ACTIVITIES
- Demonstration: Show a “Clay Slab Relief.” Start with a flat slab. Use a pencil to draw the outline, then add tiny pieces of clay to build the “high” areas.
- Practical Activity: “The Soap Carving.” Each student is given a bar of soap. They must carve a simple symbol (like a leaf or a geometric motif) into the soap to create a relief sculpture.
8. LEARNER ACTIVITIES
- Inquiry: Search for relief sculptures in your local area (on gates, furniture, or government buildings). Why do you think the artist chose relief instead of a statue?
- Creative Task: Design a relief sculpture titled “Life in my Community.” Use a flat piece of cardboard as the base and use clay to build up the shapes.
- Formative Assessment:
- Define ‘Bas-relief’. (2 marks)
- What is the difference between additive and subtractive methods? (4 marks)
- Why is light important in relief sculpture? (2 marks)
9. COMMON MISCONCEPTIONS
- Misconception: “Relief sculpture is just a drawing with lumps.”
- Correction: It is a study of depth. You must consider how one part of the object “overlaps” or sits in front of another, just like in 3D art.
- Misconception: “You need expensive stone to make relief.”
- Correction: Some of the best relief work is done in clay, soap, wood, or even recycled cement.
10. SUMMARY NOTES
- Bas-relief: Shallow projection.
- High-relief: Deep, dramatic projection.
- Methods: Additive (building) vs. Subtractive (carving).
- Light: The tool that makes your relief “read” to the viewer.
11. EXAMINATION FOCUS (UNEB-style)
a) Multiple Choice: Which method involves adding material to create relief? A) Subtractive B) Additive C) Casting D) Polishing (Answer: B)
b) Structured: State two types of relief sculpture. (2 marks)
c) Essay: Explain how an artist uses light and shadow to emphasize the depth in a high-relief sculpture. (10 marks)
12. HIGHER ORDER THINKING QUESTIONS
- How can you use relief sculpture to tell a story? (Think of how a series of relief panels could work together).
- If you were creating a relief of a face, which parts would you make “high” and which would be “low”?
13. TEACHING TIPS
- Shadow Check: Tell students to hold their relief sculpture under a desk lamp at an angle. This reveals “lumpy” areas that need smoothing or parts that need more depth.
- Tool Safety: If carving, always carve away from your body, never towards it.
14. GLOSSARY
- Relief: Sculpture attached to a background.
- Projection: The distance an object sticks out.
- Carving: Subtractive sculpting.
Classroom Visual Exercise: “The Cardboard Layers”
If you are working in a classroom, the most effective way to understand relief is through Layered Cardboard:
- Draft: Draw your image on a piece of paper.
- Trace: Separate your image into three “depths”: Background (farthest), Middle Ground (partially visible), and Foreground (closest to the viewer).
- Cut & Stack: Trace these layers onto cardboard, cut them out, and glue them on top of one another.
- Analyze: As you stack the layers, notice how the “Foreground” piece casts a shadow over the “Middle Ground.” This shadow is the “magic” of relief sculpture!
END: KEY TAKEAWAY FOR LEARNERS
Relief sculpture is your bridge between 2D and 3D. Whether you are building it up or carving it down, remember: it’s all about how your work catches the light. Go create something that stands out!
0 responses on "AD3: Three-Dimensional Arts: Relief Sculpture"