1. CURRICULUM ALIGNMENT
- Syllabus Objectives:
- To understand “Still Life” as a genre of art featuring inanimate objects.
- To learn the principles of composition, lighting, and arrangement.
- To practice rendering textures and volumes (spheres, cylinders, cubes) as seen in everyday objects.
- Prerequisite Knowledge: Shading/Tone (S2), Proportion, and Perspective (Topic 3.9).
2. TOPIC INTRODUCTION
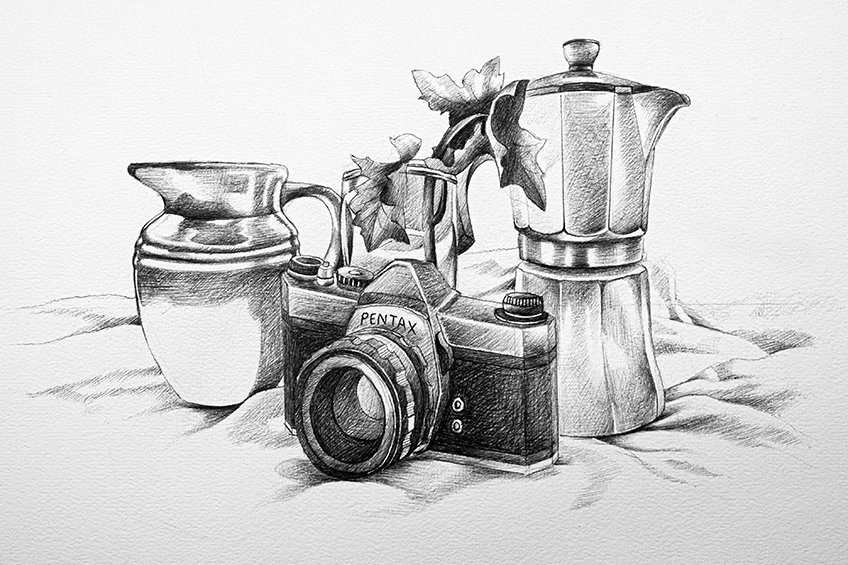
Still Life is the art of giving life to objects that cannot move. By arranging items like a fruit basket, a water jug, a pair of shoes, or local kitchen utensils, an artist learns how to see shapes, light, and texture. Because these objects sit still, they are the perfect “models” for practicing how to make a drawing look 3D.
The Hook: A master artist can make a simple clay mug look so real you could reach out and grab it. How? By noticing that the mug isn’t just one color—it has a highlight where the sun hits it, a deep shadow where it sits on the table, and a cast shadow behind it.
3. LEARNING OBJECTIVES
By the end of this lesson, learners should be able to:
- Compose a balanced arrangement of objects.
- Apply directional lighting to create shadows and highlights.
- Analyze complex objects as combinations of basic geometric forms.
- Render different textures (e.g., shiny metal, rough clay, soft fabric).
4. KEY TERMS AND DEFINITIONS
- Still Life: A work of art depicting inanimate objects.
- Composition: How you arrange the objects on your paper or table.
- Cast Shadow: The dark area created on the surface where an object sits.
- Highlight: The brightest spot on an object where light hits directly.
- Midtone: The true color of the object, away from the direct light or deep shadow.
Memory Hook: Remember “The Three Tones.” Every object needs a Highlight (light), a Midtone (color/form), and a Shadow (depth).
5. DETAILED EXPLANATION OF CONCEPTS
A. The Arrangement (Composition)
Don’t just place objects in a straight line. Use the “Rule of Triangles”:
- Vary the heights of your objects.
- Overlap them slightly so they look like they belong together.
- Place the most interesting object slightly off-center for a more professional “look.”
B. The Science of Lighting
When you look at an object, ask: “Where is the light coming from?”
- Light Source: Identify if the light is coming from a window (natural) or a bulb (artificial).
- Highlight: The brightest spot (keep this area light or white).
- Shadow: The darkest area (usually underneath and on the side away from the light).
- Reflected Light: A faint glow on the shadow side of the object, caused by light bouncing off the table.
| Object Shape | Geometric Equivalent |
| Fruit/Mug | Sphere or Cylinder |
| Box/Book | Rectangular Prism |
| Bottle | Cylinder + Cone |
6. VISUAL LEARNING SUPPORT
The Geometry of Everything
Professional still life drawing begins with breaking objects down into primitive forms. Almost every object in your home can be simplified into a cube, a cylinder, a sphere, or a cone.
- The Cylinder (The Foundation): Most mugs, bottles, and vases are cylinders. The most important detail is the ellipse (the oval shape of the opening).
- Pro-Tip: If the opening is at your eye level, it looks like a flat line. If it is below you, it looks like a wide oval. Never draw the top of a mug as a “circle”—it must always be an ellipse in perspective.
- The Sphere (The Volume): Every piece of fruit—oranges, tomatoes, mangoes—is a sphere. Once you learn to shade a sphere, you can shade almost anything.
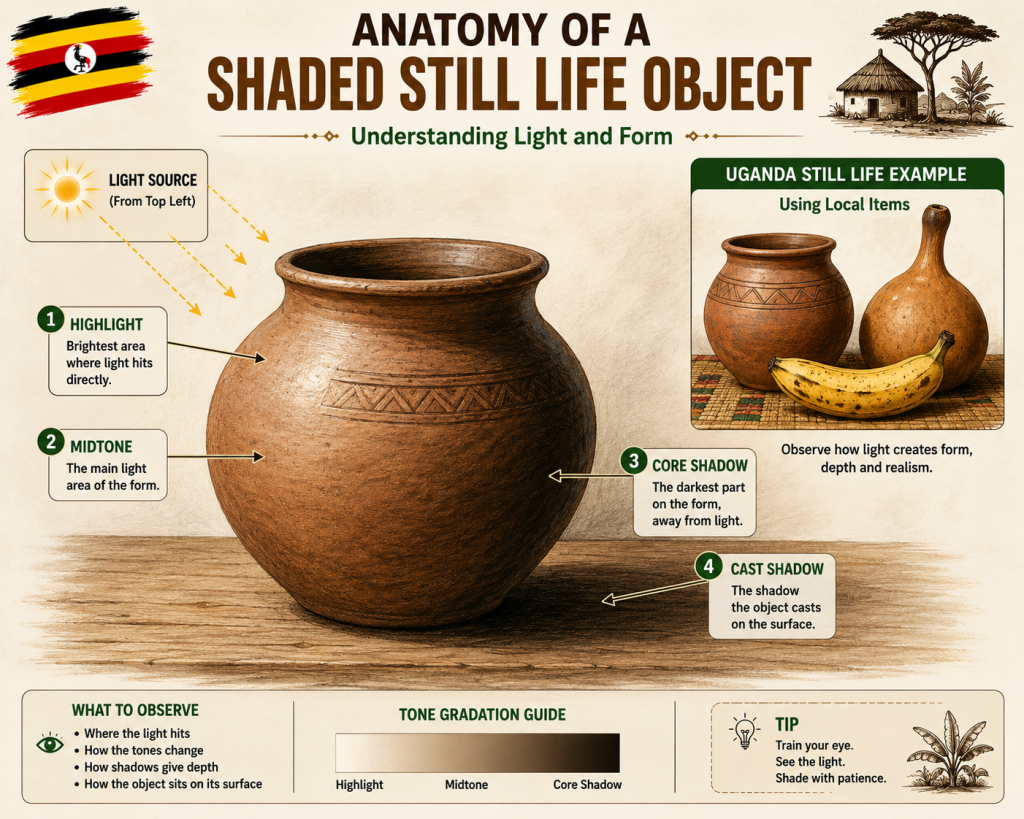
The Logic of Light (The “Rendering” Process)
To make your drawing look “real,” you must follow the logic of light. When light hits an object, it creates a specific sequence of tones:
- Highlight: The direct reflection of the light source (often the white of the paper).
- Midtone: The true color/texture of the object.
- Core Shadow: The dark “band” on the object where the light can no longer reach.
- Reflected Light: A faint, subtle light on the dark side of the object, caused by light bouncing off the table. (Beginners forget this, which makes their drawing look “heavy” and flat).
- Cast Shadow: The darkest part of your drawing, directly under the object.
[Image: A “Light Map” of an apple showing all five stages of shading, from highlight to cast shadow]
Compositional Strategies: Avoiding the “Soldier Line”
A common mistake in beginner still life is the “Soldier Line”—placing all objects in a perfectly straight, boring row.
- The Triangle Composition: Arrange your objects so they form a triangle. This forces the viewer’s eye to travel around the entire arrangement rather than just looking from left to right.
- Overlapping: When objects overlap, they create a sense of depth and space. It tells the viewer: “This object is in front of that one.” If you don’t overlap your objects, your drawing will look like a set of toys spread out on a flat table.
- Negative Space: Don’t forget the spaces between the objects. Sometimes, drawing the shape of the air between two bottles is easier than drawing the bottles themselves!
Texture: The “Touch” of the Pencil
A great still life tells the viewer how the object feels.
- Shiny/Metallic: Requires very sharp, high-contrast transitions (from bright white to deep black) with no soft blurring.
- Rough/Earthen: Requires a “grainy” or “scratchy” pencil technique to mimic the texture of clay or wood.
- Soft/Fabric: Requires long, smooth, flowing lines that follow the folds of the cloth.
[Visual: A comparison of three pencils strokes: “Metallic” (sharp/bold), “Rough” (dotted/uneven), and “Soft” (blended/long)]
7. TEACHER DEMONSTRATIONS AND PRACTICAL ACTIVITIES
- Demonstration: Use a single desk lamp in a darkened classroom to light a bowl of fruit. Show how the shadows move when you move the lamp.
- Practical Activity: “The 20-Minute Still Life.” Students arrange three items and draw them, focusing entirely on shading (not outlines).
8. LEARNER ACTIVITIES
- Inquiry: Take a photo of an object at home. Can you identify the highlight, midtone, and shadow?
- Creative Task: Create a still life arrangement using 3 objects of different textures (e.g., a metal spoon, a piece of cloth, and a fruit).
- Formative Assessment:
- Define ‘Still Life’. (2 marks)
- Why is a ‘Cast Shadow’ important? (2 marks)
- What is the difference between a ‘Highlight’ and a ‘Midtone’? (4 marks)
9. COMMON MISCONCEPTIONS
- Misconception: “I must draw the outline perfectly first.”
- Correction: Shading is more important than outlines. In nature, there are no black lines around objects—only changes in light and shadow.
- Misconception: “Shadows are always just black.”
- Correction: Shadows are rarely pure black. They often contain hints of the object’s color or the surface’s color.
10. SUMMARY NOTES
- Composition: Arrange objects to be visually balanced.
- Volume: Use light and shadow (Tone) to make objects look “fat,” not flat.
- Lighting: Pick one light source and stay consistent!
- Observation: Draw what you actually see, not what you think you see.
11. EXAMINATION FOCUS (UNEB-style)
a) Multiple Choice: Which of these is the brightest part of a shaded object? A) Cast Shadow B) Highlight C) Midtone D) Core Shadow (Answer: B)
b) Structured: State two principles of a good still life composition. (4 marks)
c) Essay: Explain the importance of light and shadow in transforming a flat circle on paper into a 3D sphere. (10 marks)
12. HIGHER ORDER THINKING QUESTIONS
- How would a still life drawing change if you used a candle as the light source versus the midday sun?
- If you were asked to paint a still life to represent “Ugandan Tradition,” which items would you choose and why?
13. TEACHING TIPS
- Squinting: Tell students to “squint” their eyes at the still life. This blurs the detail and makes it easier to see the big shapes of light and dark.
- Backgrounds: A simple piece of plain cloth behind the objects makes the shadows much easier to see.
Practical Workflow: The “Squint & Sketch”
Before you begin shading, do this:
- Squint your eyes at your setup until everything goes blurry.
- What do you see? You will see only the “Big Shapes” of light and dark.
- Trace these big shapes lightly on your paper. Do not worry about details like handles, labels, or fruit skin yet.
- Once the “Big Shapes” are correct, only then add the details.
14. GLOSSARY
- Tone: The lightness or darkness of a color.
- Inanimate: Not alive.
- Texture: The look and feel of a surface.
END: KEY TAKEAWAY FOR LEARNERS
Still life is about observation. Don’t draw the object; draw the light reflecting off the object. Master this, and you can draw anything in the world!
0 responses on "AD3: Drawing and Painting: Still Life"