
1. CURRICULUM ALIGNMENT
- Syllabus Objectives:
- To understand the concept of perspective as a tool to create the illusion of depth on a flat surface.
- To identify and apply the principles of the Horizon Line and Vanishing Point.
- To practice One-Point Perspective drawing.
- Prerequisite Knowledge: Basic understanding of geometric shapes (cubes, cylinders) and observation skills.
2. TOPIC INTRODUCTION
Perspective is the “artist’s secret” to making a 2D drawing look like a 3D world. It explains why objects seem smaller the further away they are and why parallel lines (like the sides of a road) seem to meet in the distance. Without perspective, drawings look “flat” or “cartoonish.” With it, you can draw landscapes, buildings, and rooms that look like you could step right into them.
The Hook: Stand in the middle of a straight, long road or a corridor. Look at the edges of the walls or the road sides. Do they stay the same distance apart, or do they look like they are touching each other far away? That point where they “meet” is the key to drawing depth.
3. LEARNING OBJECTIVES
By the end of this lesson, learners should be able to:
- Define key perspective terms (Horizon Line, Vanishing Point, Orthogonal Lines).
- Construct a simple one-point perspective drawing.
- Illustrate depth by varying the size and clarity of objects.
- Demonstrate how to draw a road or building using a single vanishing point.
4. KEY TERMS AND DEFINITIONS
- Horizon Line: The imaginary line at your eye level where the sky meets the ground.
- Vanishing Point (VP): The point on the horizon line where all parallel lines seem to converge and disappear.
- Orthogonal Lines: The diagonal lines drawn from the corners of an object to the Vanishing Point.
- One-Point Perspective: A method of drawing where all lines lead to a single point.
Memory Hook: Think of the Vanishing Point like a “Magnet.” It pulls all the straight edges of your buildings or roads toward it.
5. DETAILED EXPLANATION OF CONCEPTS
A. The Three Rules of Perspective
- Size: Objects closer to you are larger; objects further away are smaller.
- Position: Objects closer to the horizon line are further away.
- Converging Lines: Parallel lines (like the sides of a railway track) get closer together as they move away from the viewer.
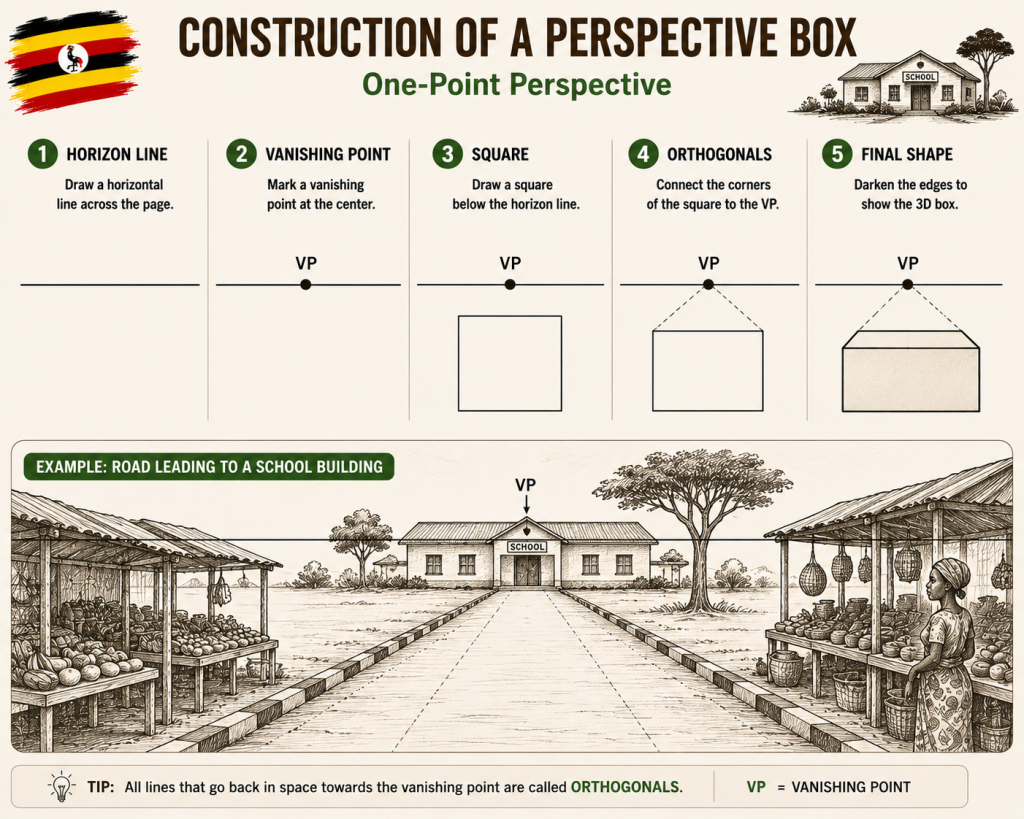
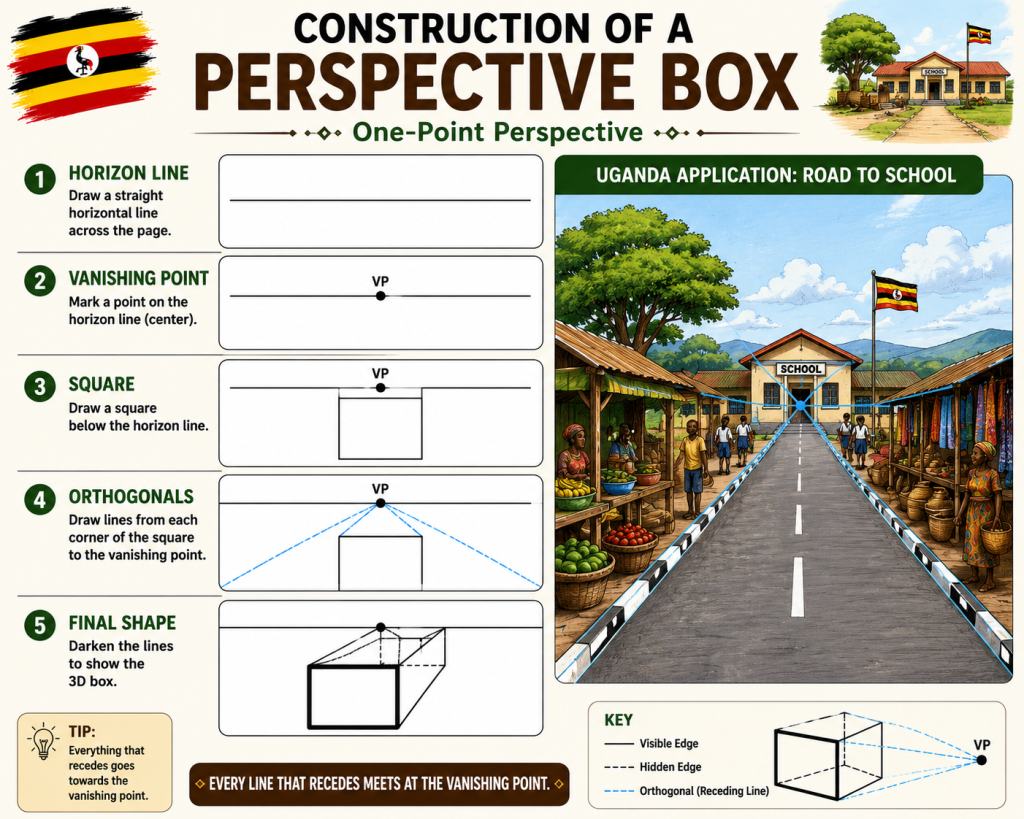
B. How to Draw One-Point Perspective
- Draw the Horizon Line: A straight horizontal line across your page.
- Place the Vanishing Point: A small dot somewhere on that line.
- Draw the Front Face: Draw a rectangle/square representing the front of an object.
- Connect to VP: Draw light lines from the corners of your square to the Vanishing Point (these are your Orthogonal Lines).
- Close the Shape: Draw lines parallel to your front face to “cut off” the depth.
| Term | What it looks like |
| Horizon Line | A straight horizontal line at eye level. |
| Vanishing Point | A single dot on the Horizon Line. |
| Orthogonal Lines | Diagonal “guide” lines leading to the dot. |
6. VISUAL LEARNING SUPPORT
The Psychology of the Horizon Line
The Horizon Line is not just a line on the paper; it represents the artist’s eye level. This is the single most important rule in perspective:
- If the Horizon Line is low: You are looking “up” at the world (like a child or someone sitting on the floor). This makes buildings look heroic, tall, and imposing.
- If the Horizon Line is high: You are looking “down” at the world (a “Bird’s Eye View”). This is useful for drawing maps, market layouts, or crowded scenes where you want to show the relationship between many objects on the ground.
- If the Horizon Line is at eye level: This is a “Normal View,” the way we see the world standing up.
Beyond One-Point: Two-Point Perspective
While One-Point Perspective is for objects facing us directly, Two-Point Perspective is for objects viewed at an angle (the corner of a building).
- The Difference: Instead of one dot, you have two. You place them at the far left and far right of your horizon line.
- The Rule: All vertical lines stay perfectly vertical (straight up and down). However, all “depth” lines move toward either the left dot or the right dot.
- Why it matters: This is how you draw a building, a table, or a box that looks realistic and professional.
[Visual: Side-by-side comparison of a box in One-Point vs. Two-Point Perspective]
The “Atmospheric Perspective” (The Artist’s Trick)
Perspective isn’t just about lines; it’s also about how we see color and clarity at a distance. This is often called Atmospheric or Aerial perspective.
- The Rule:
- Objects closer: Darker, higher contrast, more detail, and warmer colors.
- Objects farther: Lighter, lower contrast, less detail, and cooler/bluer colors.
- Example: Look at the hills surrounding Kampala. The trees close to you are dark green and sharp. The hills in the far distance look pale, blurry, and almost blue-gray. If you apply this to your paintings, your scenes will instantly gain a sense of “air” and depth.
Practical Workflow: The “Grid” Method
If you are drawing a complex interior (like a classroom), don’t draw individual objects first. Draw the Floor Grid.
- Draw your Horizon Line and Vanishing Point.
- Draw lines radiating out from the Vanishing Point to the bottom of the page (like a fan).
- Draw horizontal lines across these radiating lines, getting closer together as they move toward the horizon.
- You now have a 3D floor! Any object you draw on this grid will automatically look like it is sitting on the floor in perfect perspective.
[Visual: A 3D floor grid showing how objects (like desks or chairs) can be placed correctly within it]
7. TEACHER DEMONSTRATIONS AND PRACTICAL ACTIVITIES
- Demonstration: Use a long ruler to draw a “road” on the chalkboard. Show how the sides of the road MUST hit the same dot on the horizon.
- Practical Activity: “The City Street.” Have students draw a simple street scene. They must include at least three buildings (one on the left, one on the right, and one centered).
8. LEARNER ACTIVITIES
- Inquiry: Find a photo of a long hallway or a straight street. Use a ruler to draw lines over it—do they all hit the same spot on the horizon?
- Creative Task: Draw your classroom in one-point perspective, showing the front wall, side walls, and floor.
- Formative Assessment:
- What is the Horizon Line? (2 marks)
- Why do lines converge at a Vanishing Point? (2 marks)
- What happens to an object’s size as it gets closer to the Vanishing Point? (2 marks)
9. COMMON MISCONCEPTIONS
- Misconception: “Perspective is just drawing lines.”
- Correction: Perspective is about space. It’s about creating an environment where objects exist in 3D, not just flat on paper.
- Misconception: “All lines must hit the Vanishing Point.”
- Correction: Only receding lines (depth lines) go to the Vanishing Point. Horizontal lines stay horizontal, and vertical lines stay vertical.
10. SUMMARY NOTES
- Horizon Line: Always at eye level.
- Vanishing Point: The “magnet” for all depth lines.
- Orthogonals: Use a ruler to keep these lines perfectly straight.
- Practice: Perspective takes time to master; start with simple cubes before drawing complex buildings.
11. EXAMINATION FOCUS (UNEB-style)
a) Multiple Choice: Where are parallel lines meant to meet in a perspective drawing? A) The bottom edge B) The Vanishing Point C) The middle of the page D) The center of the object (Answer: B)
b) Structured: Define the term ‘Orthogonal Lines’. (2 marks)
c) Essay: Explain how an artist can use the Vanishing Point to show distance in a landscape painting. (10 marks)
12. HIGHER ORDER THINKING QUESTIONS
- How would your perspective drawing change if you were lying on the ground looking up (a “worm’s eye view”) versus looking down from a high balcony (a “bird’s eye view”)?
- Can a drawing have more than one Vanishing Point? Why or why not?
13. TEACHING TIPS
- Use a Ruler: Perspective drawing must be precise. A sloppy line will ruin the illusion.
- Light Lines: Draw construction lines (orthogonals) very lightly in pencil so they can be erased once the 3D form is drawn.
14. GLOSSARY
- Perspective: Illusion of depth.
- Horizon: Eye level.
- Vanishing Point: Convergence point.
Common Perspective Errors (And how to fix them)
- “The Leaning Building”: Beginners often slant their vertical lines toward the Vanishing Point.
- Correction: Vertical lines must ALWAYS remain vertical. Only the “depth” lines should lean toward the point.
- “The Floating Object”: An object drawn without a floor line often looks like it’s hovering.
- Correction: Always anchor your objects to a ground line or a grid.
END: KEY TAKEAWAY FOR LEARNERS
Perspective is the foundation of realistic drawing. If you can master the Vanishing Point, you can draw buildings, streets, furniture, and landscapes that look completely real. Get your ruler out and start practicing!
0 responses on "AD3: Drawing And Painting: Perspective"